Getting Started
Before the plugin can be used, the following needs to be done.- Installing Python and the required libraries
- MapSafe Plugin Settings
- Individual or Combined Mode
- Seting up the Working Directory
- Seting up for Notarisation
- Help Menu
Installing Python and the required libraries
Please choose Python version 3.12.4
The required Python libraries can be installed via pip.
To use pip in a Windows environment, one needs to run the OSGeo4W.bat from the 'D:\QGIS' directory (not from 'D\OSGEO4W').
These commands need to be issued using the D:\QGIS\OSGEO.bat The sample 'Kamloops' dataset used throughout this help guide and the YouTube video is in the Github repo's 'datasets' folder.
Kamloops dataset
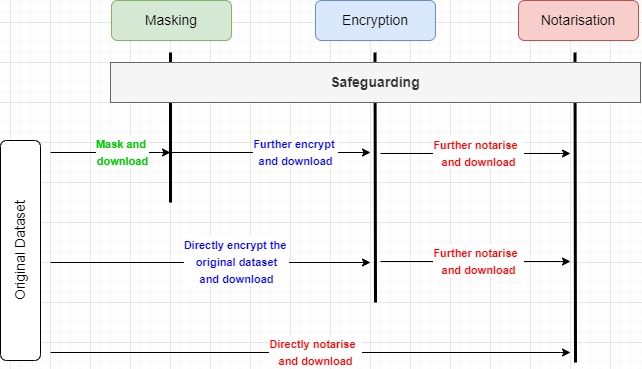
The plugin can be used in two modes. The combined mode (default) enforces and guides the user in perfoming these three functions in order in a workflow.
The individual mode allows users to use the plugin's three security functions
(donut masking or hexagonal binning, encryption and notarisation) individually or in any combination.
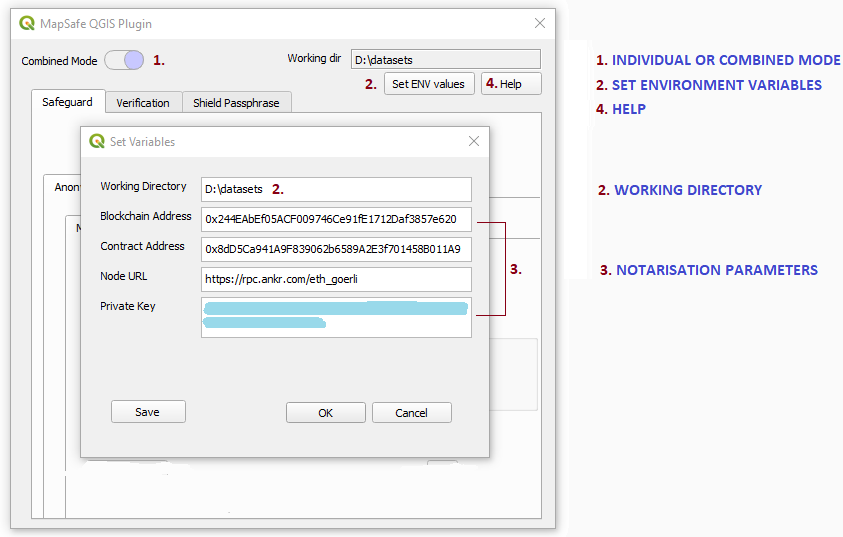
This selection can be made in the switch at the top left (see above image).
The figure below outlines the different combinations in which the security functions in the individual mode can be used.
These can be used collectively to fully safeguard their data, or independently, for example, users can choose to only mask their maps.
They can skip masking and only encrypt it and download the encrypted volume. After encryption, they have an option to further notarise it.
It is essential for users to set the working directory, where the resulting masked, binned, and encrypted datasets are Saved.
This directory is also used by the plugin to perform computations and hold temporary data.
Users need to set this directory in the env variables dialog the first time the plugin is loaded (see above image).
Ideally, all information should be notarised on the Ethereum mainnet. However, one can use the public Ethereum testnet, Sepolia for testing.
These are the steps needed for minting in Sepolia testnet:
The Help button directs the users to this website.
For example, D:\QGIS>pip install cryptography
pip install python-dotenv
pip install cryptography
pip install pycryptodome
pip install h3
pip install tqdm
pip install xkcdpass
pip install easygui or python -m pip install easygui
(python -m) pip install pyqt-switch pip install web3
MapSafe Plugin Settings
From the plugin's main window, the following could to be set.
The notarisation details is not necessary if one does not need to perform notarisation.
However, one must set the working directory.
Sample Dataset
1. Individual or Combined Mode
2. Seting up the Working Directory
3. Seting up for Notarisation
4. Help